Will all the dedicated pasta lovers please stand up?
Yea, you. I'm talking to you. I'll even stand with you if it makes ya feel better. I'd be lying if I said I didn't love pasta. It's carby, gluteny, and absorbs buttery things realllll well, y'all. It's almost summer though. I should be making/eating fresh things. Clean things. Summery things. So what gives?
Naturally, my recipe-creating juices started flowing and I decided that tortellinis
had to happen, stat. I toyed around with the idea of
Boursin and duck confit and back-and-forth with a few other flavor combos. I settled on two versions -- a lemony mushroom one and a garlicky, spinach pancetta one.
Why these flavors? I challenged myself to make summer-style tortellinis. When I eat pasta, I often find the dishes to be delicious and well-crafted, but I also find them to be rich. And heavy. Rich in such a way that after eating them, I feel like a stuffed Christmas goose ready for basting. Don't get me wrong -- I enjoy that feeling from time-to-time, but more often than not, it just ain't enjoyable.
I wanted my tortellinis to taste fresh, while also satisfying my carby craving.
Don't let sheets of pasta deter you from making these yummies. Many
Whole Foods locations sell pasta cut (or not) to your liking -- I may have mentioned my love for this service
here.
If you don't have a Whole Foods in your area, try searching for local pasta vendors. Richmonders, I used pasta sheets from
Bombolini because I just didn't feel like making pasta dough (keeping it real). The next time I make this, I may use
this recipe or
this recipe for pasta dough, and
this tool,
this tool, or
this tool to make much prettier raviolis. The stamp seems more practical for me because it eliminates the need for an egg wash to seal the edges.
In case you haven't noticed, the initial plan was to make tortellinis. After purchasing my pasta sheets from Bombolini, I realized that they were far too thick to make tortellinis. Solution? Raviolis with a biscuit cutter. Because this blog is about successes and flops, you can find my pretty hideous tortellinis below. Only took two of those for me to change my game-plan.
It doesn't matter if you decide to make tortellinis or raviolis, we all know that what really matters is the filling.
Lemon Mushroom Filling (enough filling for 48 raviolis or tortellinis - 1 tsp filling/each)
What You'll Need
- 3-4oz. mixed mushrooms (mine were cremini, porcini, and chanterelle)
- 1 tbsp butter
- 1 tsp lemon zest
- 1/2 tsp pepper
- 1/4 tsp salt
- 1/3 C pecorino, shredded
- 1 C ricotta cheese
How To Make It
- Melt butter in a skillet over medium-high heat.
- Add mushrooms, salt, and pepper to the butter and sauté until softened.
- Add sautéed mushrooms, lemon zest, and pecorino to a food processor and pulse/blend until a "dip" consistency forms.
- Empty mixture into a bowl and fold in ricotta cheese.
Spinach Pancetta Filling (enough filling for 48 raviolis or tortellinis - 1 tsp filling/each)
What You'll Need
- 1 bag spinach
- 1 package pancetta (about six slices)
- 3 cloves garlic, minced
- 1/3 C parmesan, shredded
- 1 C ricotta cheese
How To Make It
- Chop pancetta and add to a skillet over medium-high heat. Cook until almost crispy.
- Using a slatted spoon, remove pancetta from the pan and allow to rest.
- Add spinach to left over pancetta grease and wilt down.
- Add minced garlic to the wilted spinach and toss to coat.
- Add pancetta, wilted spinach with garlic, and parmesan to a food processor and pulse/blend until a "dip" consistency forms.
- Empty mixture into a bowl and fold in ricotta cheese.
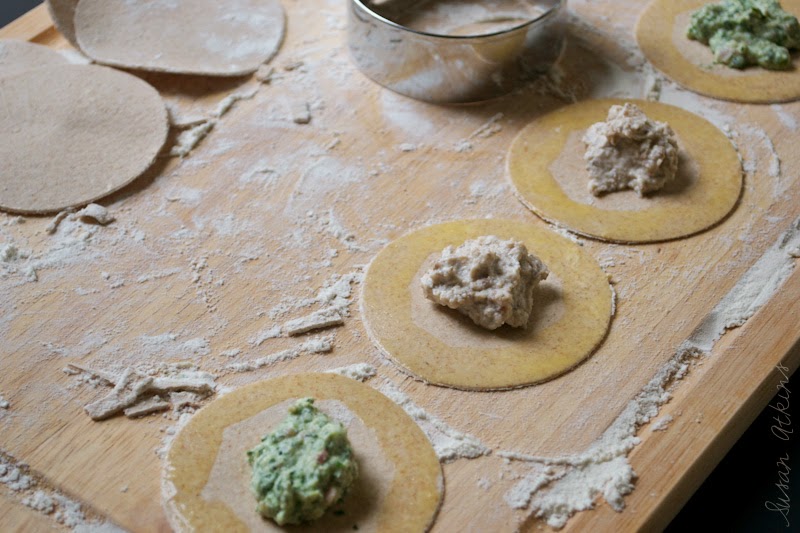
Ravioli
What You'll Need
- Pasta dough of your choosing or sheets of pre-made pasta. If you decide to buy it, tell the person at the counter what you're making and that you need it pressed thin, especially if you're making tortellinis.
- A cookie cutter or biscuit cutter to make your ravioli/tortellini rounds (I used a 3" biscuit cutter).
- Sheet pan for your completed raviolis to rest on.
- Flour for coating your surface and your pans so that the dough doesn't stick and to ensure that the raviolis/tortellinis don't stick to one another.
- 1 egg - you will need an egg wash to seal the filling between the pasta sheets.
How To Make It
- Flour the surface that you will be cutting your ravioli rounds on. Also, flour your sheet pant for your completed raviolis.
- Before cutting your sheets, have a plan as to how many rounds you will be able to get from one sheet.
- Start cutting. You can either cut all the sheets at once and then fill them, or cut one sheet and fill one sheet, cut one sheet and fill one sheet, and so on. I prefer the latter method, so that your pasta doesn't dry out before you get to filling them.
- Crack an egg in a bowl and mix to combine the yolk and the white.
- Once you're ready to fill, using a teaspoon, spoon your mixture into the center of one disc. Using a brush or your finger, spread egg wash along the outer edge of each disc and seal together. You want to make sure that the "pocket" containing your filling has no air in it that can escape while cooking. Repeat this process until you have made 48 raviolis or to your liking.
- When ready to eat, boil a pot of salted water adding five raviolis at a time and cook for 7 to 8 minutes. You can add a touch of butter or a little olive oil to the boiling water to keep the raviolis from sticking to one another.

My biggest fear was that my edges weren't sealed well enough and that my delicious filling was gonna spew out into my boiling water. I'm happy to report that they faired just fine.
To complete the pancetta spinach raviolis, just melt some butter in a pan on the stove and sprinkle garlic salt into the butter, then drizzle over top the raviolis. Top with a little shredded parmesan and you're good to go.
To complete the lemon mushroom raviolis, make the lemon cream sauce below, and top with fresh lemon zest and shredded pecorino.
Lemon Cream Sauce
What You'll Need
- 2 tbsp butter
- 1 C whipping cream or half & half
- 1/8 C fresh-squeezed lemon juice
- 1/2 tsp lemon zest
How To Make It
- Melt butter in a small sauce pan.
- Add cream to the melted butter and simmer for a minute or two.
- Once simmering, add the lemon juice and lemon zest and continue to simmer for another minute.
- Remove from heat and drizzle over mushroom raviolis.
One good thing about both of these fillings is that they can be used in various dishes such as plain pasta noodles or as a dip for crackers. I had leftovers of each, but the spinach one is
perfect on crackers! I will definitely be making it in the future to take to get-togethers. It's also good on bread, a spoon, or a finger! Not that I know or anything. The mushroom one is pretty divine on pita chips. Even if making raviolis isn't your thing, these would make perfect party dips for any occasion!
O and the lemon cream sauce? Yea, you can soak it up real nice with some crusty bread and make a meal off just that.
The best part? These fillings are delicious and refreshing -- just serve these summer-style raviolis with a side salad and you've got a wonderful summer-time dinner.
If you want more information on tortellini/ravioli making, try visiting
this site for some useful tid-bits.
Have you ever made ravioli? If so, what kinds of fillings did you make? Were they meaty or cheesy? Did you use any special tools to make them?
-Sue